3-2-1 Method for Cooking BBQ

The Greatest Way to Cook Pork Ribs
Everyone knows that person that is known for their incredible skills in cooking or that incredible recipe that only they can cook. You know what I'm talking about, maybe it is your Grandmother and her succulent biscuits or the next door neighbor that grills the best hamburgers in the world. Most of the time, their secret is something so small you wouldn't even think about it a second time. Sort of like the water that makes San Francisco Sour Dough so much better than everywhere else.
BBQing pork ribs is nothing different. There are secrets to taking your BBQ smoking skills to the next level (or maybe two levels) is to use the 3-2-1 method. The funny thing is, this secret technique is so easy to do there is no reason to not use it! So go grab some ribs and foil and we will smoke up some fabulous BBQ.
If you find this lens helpful, please help me out by clicking the like button above.

Don't over complicate the 3-2-1 method
Ribs for Dummies
It is all too easy to make this method way more complicated than it really is. All you need to do is follow this easy three step process to have perfect ribs every time.
It is very important to realize that you are not supposed to put your ribs in the crock pot or boil them for any reason. I don't care if someone has a gun to your head, don't do it! This will make your ribs tasteless and maybe even chewy. Ugh! When performed properly, the 3-2-1 method will make the most tender ribs you've ever had, trust young padawan.
The three basic steps are:
1. Smoking
2. Wrapping
3. Finishing
Lets take a look at each one of these in depth in the next sections.
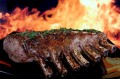
Smoking Ribs
Low and slow is the name of the game
If you have ever smoked ribs before, you know this step well. Once you have prepared your ribs to your normal specifications (removing the membrane, marinating, and rubs), drop them on the grill for the next three hours. There isn't anything magical about this stage, just good old fashion smoking.
There are a few different schools of thought (ok, maybe it could be classified more as religions) about what to do during these three hours. Some people peek every 30 minutes to an hour and spritz with apple juice or other some such concoction to keep the ribs moist and tender. Others declare with religious fervor that once the ribs have started, you should never look until they are done. No matter which camp you are in, the 3-2-1 cooking method for ribs will make the most tender ribs you've ever had.
The main thing to keep an eye on is that you continue to have smoke throughout the 3 hours. Watch for the famous "TBS" or Thin Blue Smoke is constantly streaming from your smoker. Keep the smoke going and the heat around 225 degrees and all will be smiles and rainbows.
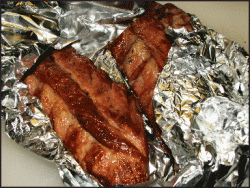
Wrapping the Ribs
Snug as a bug in a rug
The next two hours are the easiest you'll ever have in your cooking experience. The only thing to do is to wrap your ribs in heavy duty foil, juice, and toss them back on the 225 degree smoker. Yep, it is really that easy!
What is the catch? I'm glad you asked. To put that special twist to your ribs, you can add different ingredients in with your ribs right in the foil. Most people will add at least a 1/4 cup of apple juice in with them, but there are tons of other things you can do to make it even better.
The key to adding the ingredients is to play around with flavors you like. The most common ingredients to add in with the ribs is:
Brown Sugar (the more the better)
Butter
Honey
Apple Cider Vinegar
No matter what you add, make sure there is some sort of liquid. This is the catalyst that will make your ribs more tender than you thought possible.
Finishing Touches
The home stretch
Once you have smoked for three hours and wrapped for two more hours, you are almost done. Simply unwrap your meaty treats and put them back on the smoker for one more hour. Yes, after this last hour you can pull them off and eat until your heart is content.
The last hour of cooking is the perfect time for glaze with your favorite sauce if you would like. Some enjoy them "naked" (no sauce). This last step is also for firming up the BBQ Bark. No, they won't start yipping like a little dog. The bark is the dark crispy crust that forms around the ribs and gives an awesome taste.
Once the hour is up, yank those puppies off of the grill!
Let 'Em Rest
Hold back for just a little bit more
If you wan't to go that last extra bit to make your awesome ribs just that much more amazing, just wait for 20 minutes before you cut into them. Seriously, that is the last tip, just wait for a little bit.
If you let the ribs just set there on the counter for a little bit then the juices will flow back through the meat. What happens during cooking is all the juices move to the outside of the meat and it takes a bit for it to flow back through to make everything perfectly moist again.
If you cut into them before the meat has rested, all the juices will flow out onto your plate and you can kiss your juiciness good-bye. I'm not saying they won't be delicious ribs, they just won't be as perfect as possible.
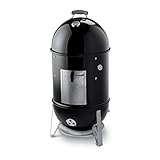
Great BBQ Stuff on Amazon

Fabulous Grill for Beginners
I know you have your own fabulous tips that you would like to share, here is your chance. What kinds of things do you do to make the perfect rack of ribs?